When the original operating system of a cloud server cannot start normally, you can enter Rescue Mode, mount the original system disk, and back up important data. This document explains how to perform these operations in Linux and Windows rescue systems.
Important: Before performing rescue operations, confirm the target disk and partition. Do not initialize, format, partition, repair the file system of, or write data to the original system disk, as doing so may overwrite data or cause further damage.
1. What Is Rescue Mode?
Rescue Mode (Linux Rescue Mode) is a temporary maintenance system provided for cloud servers. After a server enters Rescue Mode, it no longer starts from the original system disk. Instead, it starts from an independent rescue image. Even if the original operating system cannot start normally, you can inspect disks, mount the original system partition, and recover important data.
Rescue Mode is commonly used in the following situations:
- The operating system cannot start normally;
- The boot configuration is incorrect or system files are damaged;
- Files in the original system need to be backed up before reinstalling the operating system;
- A disk needs to be inspected offline or a system fault needs to be troubleshot.
2. How Do I Back Up Data in a Linux Rescue System?
1. Enter Rescue Mode and Log In
- Log in to the cloud server control panel and select the option to enter Rescue Mode.
- Follow the instructions on the page to set a temporary password for the rescue system, and store it securely.
- After the rescue system has finished starting, log in using an SSH client. GMSSH is recommended because its visual file panel makes it easier to download data.
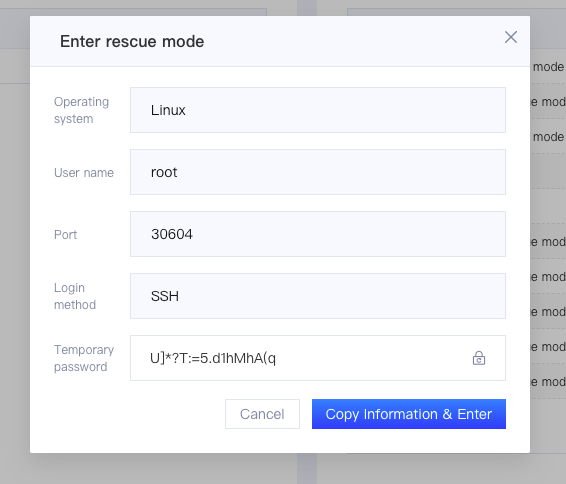
Figure 1: Entering Rescue Mode from the control panel
When logging in through SSH, use the rescue system IP address, port, and username displayed in the control panel, and enter the temporary password you just set. Refer to the control panel for the exact login information.
2. Identify the Original System Disk and Partition
Open a terminal in GMSSH and run the following command to view the disks, file systems, and mount points:
lsblk -f
To view disk capacities at the same time, run:
lsblk -o NAME,SIZE,FSTYPE,LABEL,UUID,MOUNTPOINTS
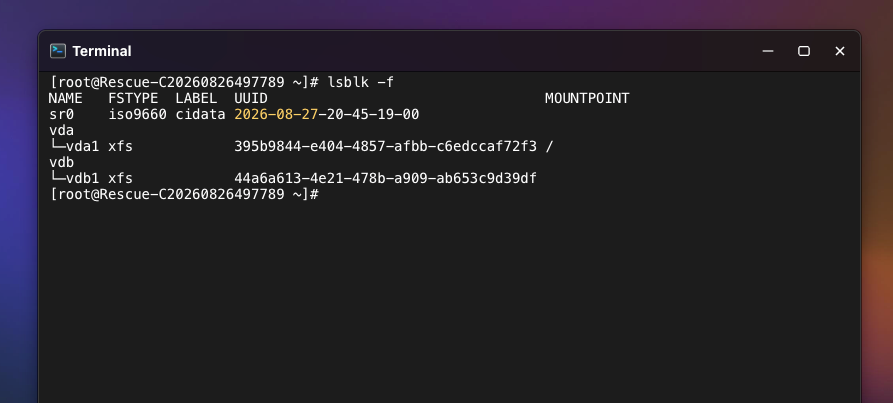
Figure 2: Viewing disks and partitions using the lsblk command
Example output:
NAME   FSTYPE  LABEL  UUID                                 MOUNTPOINT
sr0    iso9660 cidata 2026-08-27-16-36-38-00
vda
└─vda1 xfs            395b9844-e404-4857-afbb-c6edccaf72f3 /
vdb
└─vdb1 xfs            44a6a613-4e21-478b-a909-ab653c9d39df
In the example above, /dev/vda1 is mounted at the rescue system's root directory, /. The unmounted /dev/vdb1 is likely the original system partition.
Note: Disk names may vary between servers and can include vda, vdb, sda, or nvme0n1. Do not identify the original system disk based only on its device name. Confirm it by considering its capacity, file system, partition structure, and current mount points together.
3. Mount the Original System Partition in Read-Only Mode
First, create a mount directory:
mkdir -p /mnt/system
If the original system partition uses XFS (/dev/vdb1 in this example), it is recommended that you mount it in read-only mode without replaying the log:
mount -t xfs -o ro,norecovery /dev/vdb1 /mnt/system
If an XFS duplicate UUID message appears, try:
mount -t xfs -o ro,norecovery,nouuid /dev/vdb1 /mnt/system
If the original system partition uses ext4, run:
mount -t ext4 -o ro,noload /dev/vdb1 /mnt/system
Replace /dev/vdb1 in the commands with the original system partition you have identified. If the original system uses LVM, disk encryption, or RAID, you must first activate or unlock the corresponding device and then mount the file system it contains.
4. Check the Mount Result
Run the following commands:
findmnt /mnt/system
ls -lah /mnt/system
If you can see original system directories such as etc, home, root, usr, and var, the partition has been mounted successfully.
5. Download the Data to Be Backed Up
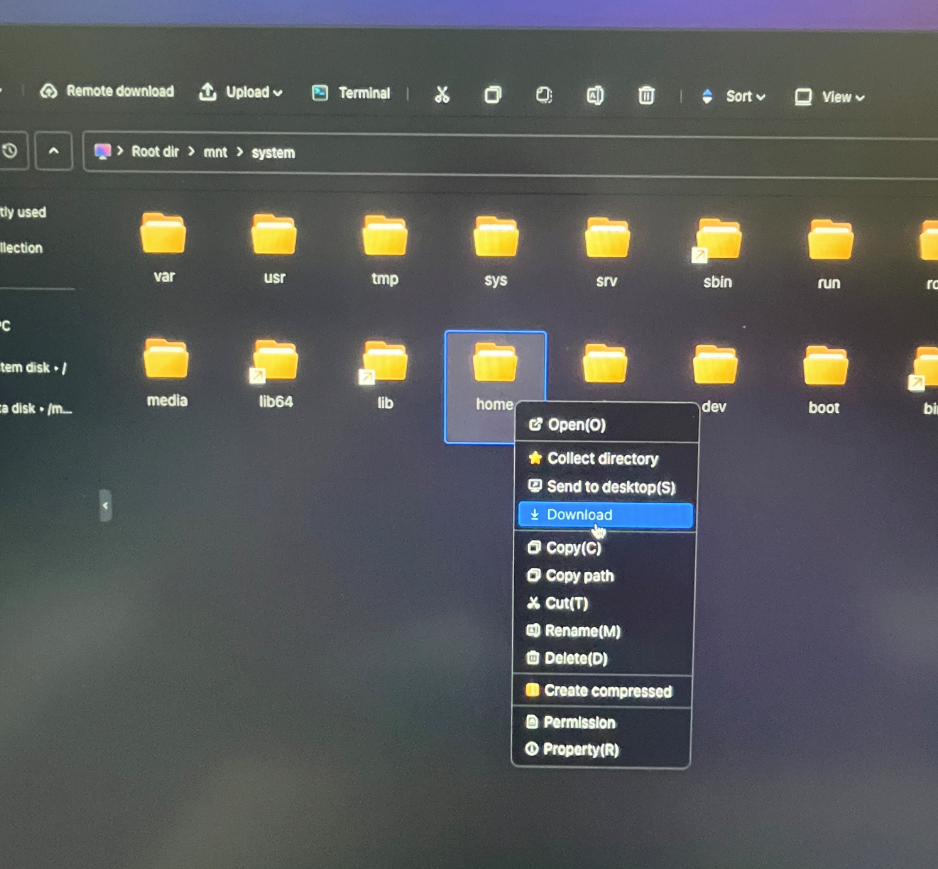
In the GMSSH visual file panel, open the /mnt/system directory, select the files or directories to be backed up, and download them to your local device. It is recommended that you prioritize the following data:
- Website files, application files, and user-uploaded attachments;
- Database backup files and database data directories;
- Important files in user directories;
- Required configuration files, certificates, and keys.
Database note: Directly copying a database data directory may not produce a consistent backup that can be restored directly. If the original database service can still start, prioritize using the database's built-in export tool. If only the data directory can be recovered, save the database version information and relevant configuration files as well.
Figure 3: Downloading backup data through the GMSSH file panel
After the download is complete, check locally whether the files can be opened normally and confirm that all important directories have been saved. To unmount the original system partition, run:
umount /mnt/system
3. How Do I Back Up Data in a Windows Rescue System?
1. Log In to the Rescue System and Open Disk Management
Log in to the Windows rescue system through Remote Desktop, and then open Disk Management using either of the following methods:
- Right-click the Start menu and select Disk Management;
- Press
Win + R, enter diskmgmt.msc, and then press Enter.
2. Locate the Original System Disk and Bring It Online
Locate the original system disk in Disk Management. You can identify it based on the disk capacity, number of partitions, and partition sizes.
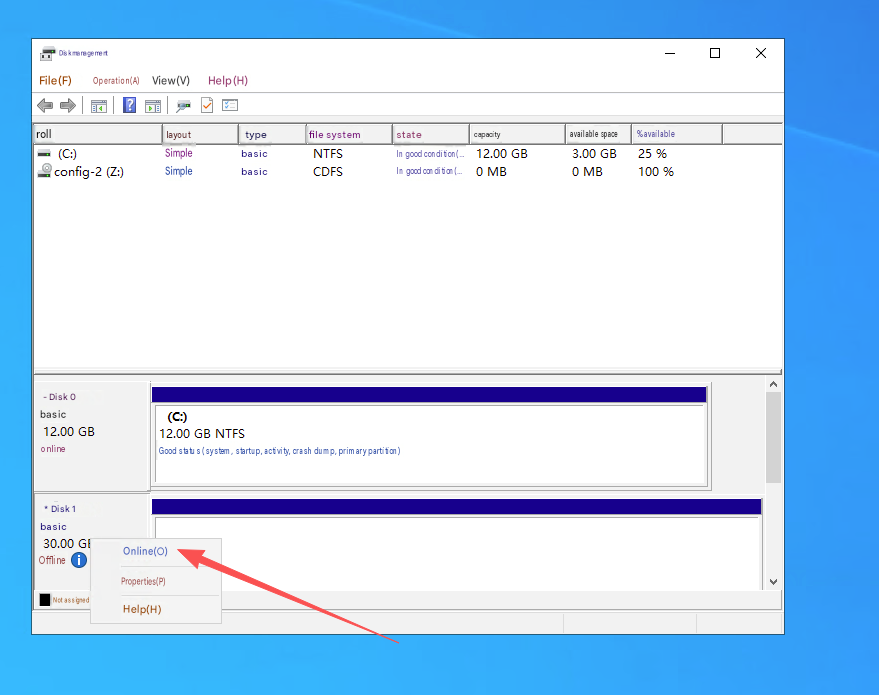
If the disk is shown as Offline, right-click the area on the left that displays information such as Disk 1 or Disk 2, and then select Online.
Do not select: Initialize Disk, New Simple Volume, Format, or Delete Volume. These operations may damage the original partition structure or cause data loss. If Windows says the disk must be formatted before it can be used, select Cancel.
Figure 4: Bringing the original system disk online in Windows Disk Management
3. Open the Original System Disk and Back Up Files
After the disk is online, check the drive letter assigned to the partition by the system. For example, if the original system partition is shown as D:, open File Explorer → This PC → Local Disk (D:), and then copy or download the files to be backed up.
If the partition does not have a drive letter, right-click it in Disk Management, select Change Drive Letter and Paths, and temporarily assign an unused drive letter. Do not format the partition.
It is recommended that you prioritize important content such as the Desktop, Documents, website directories, application data, database backups, and business configuration files. After the backup is complete, check that the files are intact and can be opened normally.
4. Notes
- About H-Series cloud servers: The Windows rescue system can only be accessed through VNC in the control panel and usually does not require a password. Remote Desktop login, direct file downloads, and external network connections are not supported. To back up files, you can purchase an additional data disk and copy important files from the original system disk to the data disk while in the rescue system. After the files have been copied, exit Rescue Mode and reinstall the operating system. Then, mount the data disk in the new system to retrieve the files.
- The rescue system is intended only for temporary maintenance: After backing up the data and confirming that the files are usable, exit Rescue Mode before reinstalling the operating system or performing subsequent repair operations.
- Prioritize read-only operations: The file system on the original system disk may already be damaged. Do not run repair commands such as
fsck, xfs_repair, or chkdsk unless you have completed the backup and fully understand the risks.
- Keep login information secure: The temporary Rescue Mode password is sensitive information. Do not send it through public channels, and exit Rescue Mode promptly after use.
If you cannot identify the original system disk, the partition cannot be mounted, the disk displays an unusual message, or the data is extremely important, stop further operations and contact your technical personnel or operations engineer.